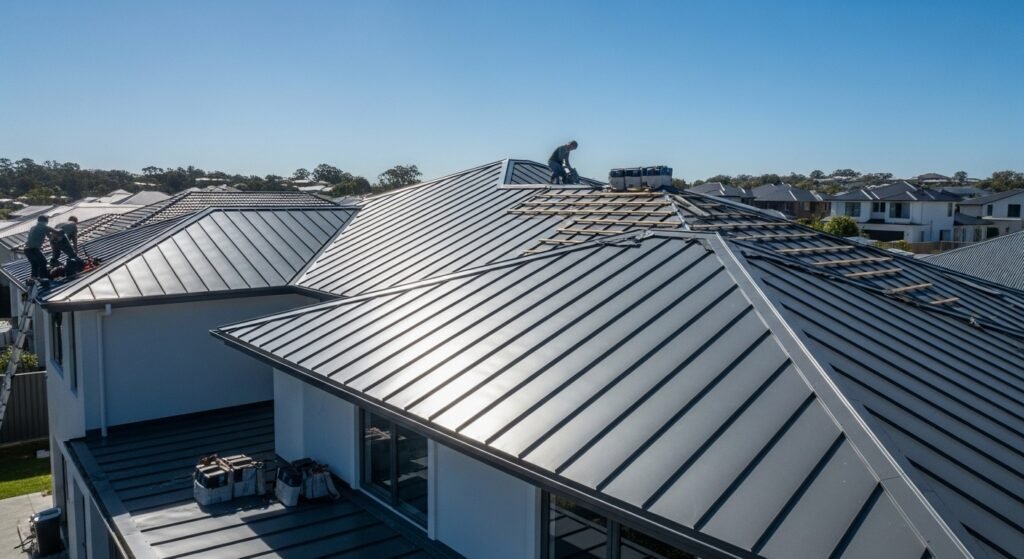
You can absolutely install a metal roof yourself, and it’s actually easier than you might think. Metal roofing has become super popular in recent years because it lasts forever, saves energy, and basically takes care of itself once it’s up there.
Unlike traditional asphalt shingles that need replacing every 20-30 years, a metal roof can last 50 years or more. It reflects heat in summer, which cuts your cooling costs. And it sheds snow and debris like nothing else.
You’ve got three main types to choose from: standing seam (those vertical panels with raised seams), corrugated metal (the wavy stuff you often see on barns), and metal shingles (which look like regular shingles but are made of metal). Each installs a bit differently, but the basics are the same.
If you’re debating between metal and traditional shingles, check out our guide on how to install roof shingles to see how they compare. Metal costs more upfront but pays off over time.
Tools and Materials Needed
Let’s get your shopping list together before you start.
Safety gear comes first. You need a harness, non-slip boots, safety glasses, and work gloves. Metal edges are sharp, and roofs are high. Don’t mess around with safety.
For tools, grab a drill with plenty of battery power, measuring tape, chalk line, tin snips or a circular saw with a metal blade, and a ladder tall enough to reach your roof comfortably. You’ll also need a magnetic screw holder for your drill trust me, this saves so much time.
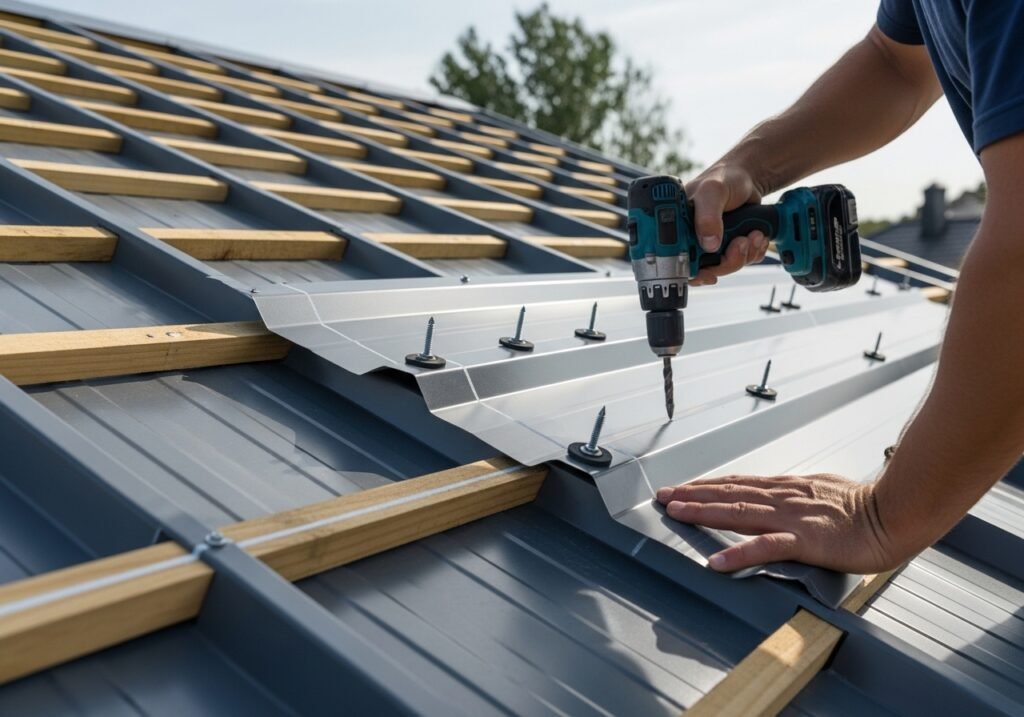
The materials include your metal roofing panels (obviously), special metal roofing screws with rubber washers, underlayment, ridge caps, and flashing for edges and valleys. The screws are important regular screws will rust and leak. You need the ones designed for metal roofing.
Standing seam roofs need a special seaming tool to lock the panels together. You can rent this if you’re going that route. Corrugated metal is simpler you just overlap and screw it down.
Get a caulking gun and some roofing sealant too. You’ll use this around screws and seams for extra waterproofing.
If you’re working on a steep roof, consider roof brackets and planks. They create a safe platform to stand on while you work.
Different metal types need different blades. Steel and aluminum cut easily with tin snips. Thicker gauge metal might need a circular saw. Just make sure whatever blade you use is rated for metal cutting.

Installing the Metal Roofing Underlayment
Underlayment is your insurance policy against leaks.
This waterproof layer goes down before the metal panels. It catches any water that might sneak past the panels and channels it away. With metal roofing, you typically use synthetic underlayment or a special high temperature felt.
Why high temperature? Metal roofs get hot in the sun. Regular roofing felt can deteriorate under that heat. Synthetic underlayment handles it better and lasts longer.
Start at the bottom edge and roll it out horizontally. Keep it straight and smooth. Any wrinkles will show through metal panels more than through shingles.
Overlap each row by at least six inches. The upper row should cover the lower one so water runs down without finding gaps. Nail or staple it every foot or so just enough to keep it flat and prevent wind from catching it.
Pay extra attention to valleys and edges. These spots handle the most water, so they need solid protection. Some installers use ice and water shield in valleys for maximum protection.
Cold weather installation requires special attention. Synthetic underlayment gets stiff when it’s freezing. Let it warm up a bit before unrolling, or it might crack. If you can, install when it’s at least 40 degrees.
The underlayment also provides some insulation and helps reduce noise. Metal roofs can be loud in heavy rain. Good underlayment muffles that sound.
Don’t leave underlayment exposed for days. UV rays break it down. Get your metal panels on within a few days of laying the underlayment
Metal Roofing Panel Installation
Start at one corner of the roof and snap a chalk line to keep the panels straight, leaving about a 1-inch overhang at the edge. Secure the first panel carefully use the flat section for standing seam panels and the raised ridges for corrugated metal. Always use rubber washer screws and tighten them just until snug to avoid crushing the seal, following proper spacing guidelines. Leave slight room for expansion since metal expands and contracts with temperature changes, and check alignment after each panel. Use the right cutting tools with safety glasses, crimp standing seam panels properly, and measure carefully before cutting the final row to ensure a clean fit.
Installing Metal Roofing Over Shingles
You can install metal right over existing shingles, which saves time and money.
This approach works best when your current shingles are in decent shape not curling, buckling, or missing. You’re basically using the old roof as extra underlayment and insulation.
First, make sure your local building codes allow this. Some areas require you to strip the old roof no matter what. Others limit how many layers you can have.
The old shingles add weight, so make sure your roof structure can handle it. Metal roofing itself is light, but shingles plus metal still weighs more than just shingles.
Install vertical strapping (furring strips) over the shingles. These create an air gap between the old roof and new metal panels. The air gap improves ventilation and insulation. Space the strips 24 inches apart, running from bottom to top.
Screw the strapping into the roof rafters, not just the shingles. Long screws that penetrate into the actual structure give you solid attachment points.
Some people skip the strapping and install metal directly on the shingles. This works, but you lose the ventilation benefit. The metal will be noisier too since there’s no air gap to buffer sound.
Once your strapping is up, install the metal panels the same way you would on a bare deck. Screw into the strapping, making sure your screws are long enough to go through the metal, strapping, shingles, and into the deck.
The main benefit here is cost savings. You save the labor of tearing off old shingles and the disposal fees for all that waste. The old roof also adds an extra layer of insulation.
The downside is you can’t inspect the deck for damage. If there’s rot under those shingles, you won’t know until it becomes a bigger problem. That’s why this only works if your existing roof is in good shape.
Installing Ridge Caps and Flashing
These finishing touches keep water out of critical spots.
Ridge caps cover the peak where two roof slopes meet. Water loves to find these joints and sneak through. Proper ridge caps prevent that.
Most metal roofing comes with matching ridge caps. They’re usually pre-bent to the right angle. If your roof has an unusual pitch, you might need custom caps.
Start at one end of the ridge and work toward the other end. Overlap each ridge cap section by several inches usually six to eight inches. This overlap should face away from prevailing winds.
Secure ridge caps with screws through the top, down into both roof panels below. Use plenty of screws. Wind tries to pry these caps up, so they need solid attachment.
Run a bead of sealant under the overlapping sections for extra protection. This prevents wind driven rain from sneaking through.
Flashing goes anywhere the roof meets something else around chimneys, vent pipes, skylights, and along walls. It bridges the gap and keeps water out.
For chimneys, use step flashing that weaves between the metal panels and chimney. Each piece of step flashing overlaps the next one as you go up. Then a final cap flashing goes over the top edge.
Valley flashing is crucial. Valleys handle tons of water since they collect runoff from two slopes. Install wide valley flashing before the metal panels go on. The panels should overlap the valley flashing by several inches on both sides.
Edge flashing (also called drip edge) goes along the eaves and rakes. It prevents water from running back under the roof edge and rotting the fascia boards.
Apply sealant liberally around all flashing. Don’t be stingy. A little extra sealant costs pennies compared to fixing a leak.
Fastening and Securing the Metal Roof
The right fasteners make all the difference between a roof that lasts and one that fails.
Metal roofing screws are specially designed with a hex head for drill bits and a rubber washer that seals when compressed. Never use regular screws or nails. They’ll rust and leak within a year or two.
The rubber washers are the key. When you tighten the screw, the washer compresses and forms a watertight seal around the hole. But overtightening crushes the washer and ruins the seal. Tighten until snug, then stop.
Different panel types need different fastening patterns. Corrugated metal gets screwed through the ridges (high points). This keeps water away from screw holes. The screws go every other ridge, or according to manufacturer specs.
Standing seam panels hide most screws. You only screw the first panel and the last panel. Everything in between clips together and floats, allowing for thermal expansion.
In high wind areas, you need more fasteners. Coastal regions or tornado zones might require screws every foot instead of every two feet. Check your local building codes.
Some installers make the mistake of mixing fastener types. Don’t use aluminum screws with steel panels or vice versa. Different metals touching each other causes galvanic corrosion. Use screws that match your panel material.
Another common mistake is drilling pilot holes. Don’t do this with metal roofing screws. They’re self-tapping, meaning they drill their own holes. Pilot holes just create opportunities for leaks.
Place screws perpendicular to the panel surface, not at an angle. Angled screws don’t seal properly and are easier for wind to pull out.
Keep your drill speed moderate. Too fast and you can strip the screw or over tighten before you realize it. Let the drill do the work don’t force it.
Use a magnetic screw tip to hold screws in place. Fumbling with screws on a roof is frustrating and wastes time. A magnetic tip makes one handed operation easy.
Cost of Metal Roofing Installation
Metal roofing costs more upfront but saves money long term.
Professional installation typically runs $7 to $12 per square foot for basic metal roofing. Standing seam costs more maybe $10 to $16 per square foot. For a 2,000 square foot roof, that’s $14,000 to $32,000.
DIY cuts those costs way down. The panels themselves cost $2 to $5 per square foot for corrugated or basic metal. Standing seam panels run $4 to $8 per square foot.
For that same 2,000 square foot roof, you’re looking at $4,000 to $10,000 for materials if you go the DIY route. Maybe $6,000 to $16,000 if you choose standing seam.
Add in underlayment ($200-500), screws and fasteners ($100-300), ridge caps ($200-400), and flashing ($150-300). You might need to rent a seaming tool for standing seam installation – that’s another $100-200.
Total DIY cost: roughly $5,000 to $17,000 depending on your choices. Compare that to $14,000 to $32,000 for professional installation. You could save $10,000 or more.
But consider the value of your time. Installing a metal roof takes longer than shingles for most DIYers. Figure at least a week for a medium-sized roof if you’re working alone.
Metal roofing is more cost effective than shingles over time. A $10,000 metal roof that lasts 50 years costs you $200 per year. A $6,000 shingle roof that lasts 20 years costs $300 per year. Plus you save on cooling costs.
The resale value boost matters too. Metal roofs are attractive to buyers because they know they won’t need a new roof for decades.
Safety Tips for Installing Metal Roofing
Metal roofing is less forgiving than shingles when it comes to safety.
The panels are slippery, especially when wet or covered with morning dew. Rubber soled boots with good tread are essential. Leather-soled boots will send you sliding.
A safety harness isn’t optional. Tie off to a solid anchor point never to a vent pipe or other roof fixture. The harness should be snug but comfortable. Practice using it before you get on the roof.
Sharp edges are everywhere with metal roofing. The panel edges, cut edges, and even screw points can slice you open. Heavy duty work gloves prevent most cuts. Long sleeves help too.
Eye protection matters more with metal than with shingles. Cutting metal sends tiny shavings flying everywhere. These can seriously damage your eyes. Wear safety glasses the entire time you’re working.
On sloped roofs, use roof jacks and planks to create stable platforms. Don’t try to balance on the metal panels themselves while you work. They’re too slippery.
Ladder safety is crucial. Your ladder should extend at least three feet above the roof edge. Secure it at the top so it can’t slide sideways. Never lean too far to either side move the ladder instead.
Watch the weather carefully. Wind makes handling large metal panels dangerous. They act like sails and can pull you off balance or off the roof entirely. Never work in wind over 20 mph.
Metal conducts electricity. Stay away from power lines. If you need to work near them, call the power company to temporarily disconnect or insulate them.
The panels get incredibly hot in direct sun. Wear gloves when handling them, and try to work in the morning when it’s cooler.
Have someone on the ground to help. They can hand up materials, call for help if something goes wrong, and spot you while you work. Never roof alone if you can avoid it.
Common Metal Roofing Installation Mistakes to Avoid
Even experienced installers make these mistakes. Don’t be one of them.
Overtightening screws is probably the most common error. People think tighter is better, but with rubber washered screws, it’s not. Over tighten and you crush the washer, which ruins the seal. Tighten until snug, then stop.
Not allowing for expansion is another big one. Metal expands and contracts with temperature changes. If you lock it down too tight, it will buckle and warp as it tries to expand. Leave a tiny bit of play in your fasteners.
Forgetting about underlayment or using the wrong type causes problems down the road. Metal roofs need high temperature underlayment. Regular felt breaks down from the heat. Don’t cheap out here.
Improper panel overlap lets water through. Each panel must overlap the one before it by the correct amount. Too little overlap and water gets in. Too much overlap and you waste materials and create unnecessary ridges.
Skipping ridge caps or installing them poorly is asking for leaks. The ridge is where water loves to sneak in. Proper ridge caps with good sealant prevent this.
Mixing metal types causes corrosion. Don’t use steel screws with aluminum panels or vice versa. Use fasteners that match your panel material.
Not checking for square before starting leads to crooked panels that get worse as you go up. Snap your first chalk line carefully and check it from multiple spots.
Working too fast causes all sorts of problems. Take your time. Every screw and every panel matters. Rushing leads to mistakes that come back to haunt you during the first big rainstorm.
Ignoring manufacturer instructions is foolish. They know their product better than you do. Follow their specs for overlap, fastener placement, and spacing.
Conclusion
Installing a metal roof yourself is challenging but totally doable for someone with decent DIY skills and the right tools.
The key is taking your time, following each step carefully, and not cutting corners on materials or safety. A properly installed metal roof will last 50 years or more, so it’s worth doing right the first time.
Start with good preparation, use quality underlayment, install panels carefully with proper fasteners, and finish with solid ridge caps and flashing. Those basics will give you a roof that protects your home for decades.
The money you save doing it yourself can be substantial – potentially $10,000 or more. But be realistic about your abilities and the time commitment involved.
If your roof is complex, very steep, or if you’re just not comfortable working at heights, call in the professionals. Manhattan Roofing and similar companies have the experience and insurance to handle tricky installations safely.
For straightforward roofs and confident DIYers, though, metal roofing installation is an achievable project that adds real value to your home.
Good luck with your roof!